The short answer
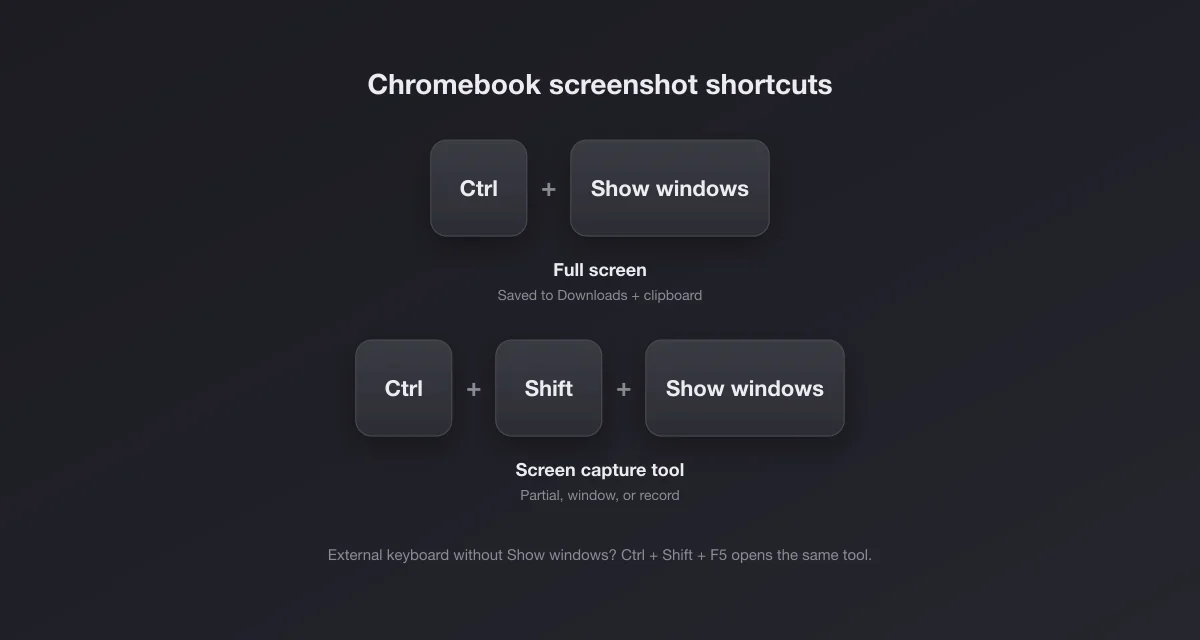
Press Ctrl + Show windows for the whole screen. Press Ctrl + Shift + Show windows to open the capture toolbar, where you can drag an area, pick a single window, or start a recording.
The Show windows key is the one in the top row with a rectangle and two lines next to it, usually where F5 would be on a PC keyboard. Every screenshot is saved to your Downloads folder and copied to the clipboard at the same time, so you can paste it straight away.
Find your keyboard in this table
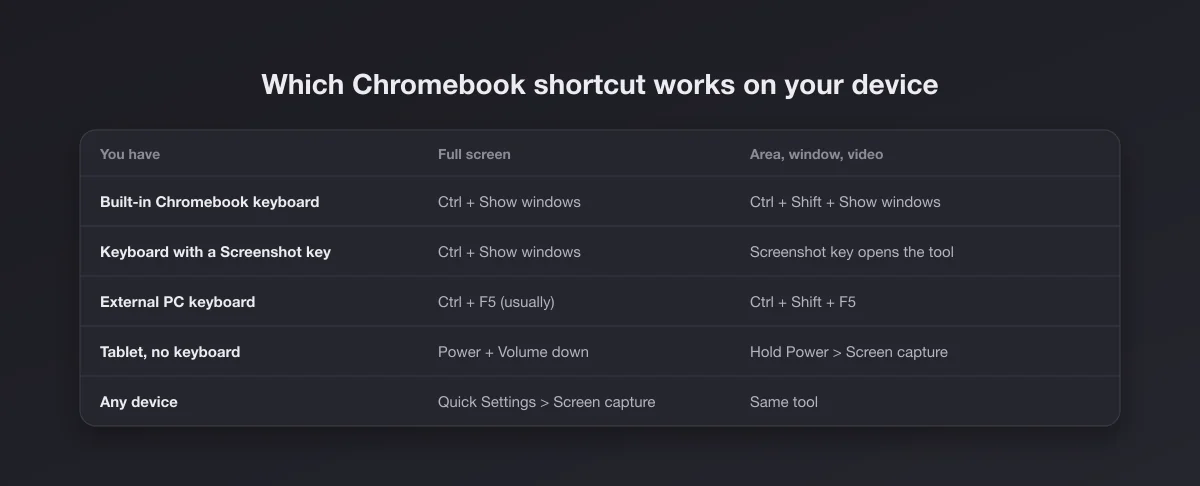
Most "my Chromebook screenshot shortcut does not work" problems come from pressing the right combination on the wrong keyboard. Pick your row.
| What you have | Full screen | Area, window or recording |
|---|---|---|
| Chromebook's own keyboard | Ctrl + Show windows | Ctrl + Shift + Show windows |
| Newer keyboard with a Screenshot key | Ctrl + Show windows still works | Press the Screenshot key, then choose in the toolbar |
| External PC keyboard (no Show windows key) | Ctrl + F5 on most setups | Ctrl + Shift + F5 |
| Tablet or convertible folded back | Power + Volume down | Hold Power, then tap Screen capture |
| Any Chromebook, no keys at all | Quick Settings, then Screen capture | Same toolbar |
The capture toolbar, step by step
Ctrl + Shift + Show windows does not take a picture by itself. It opens a small toolbar at the bottom of the screen, and that toolbar is where every option lives.
- Pick Screenshot or Screen record with the two buttons on the left.
- Pick the mode: full screen, partial (an area you drag) or window.
- Capture. For a partial screenshot, drag the box and click Capture. For a window, click the window you want.
Three small things make the partial mode much less fiddly, and Google documents all of them: press Space to move the whole selection, press Tab to jump between the corner handles, and use the arrow keys to nudge the height and width one step at a time. Precise crops without a steady hand.
The toolbar remembers your last mode, so if you always grab the same kind of capture, it is one shortcut and one click from then on.
No keyboard shortcut needed: Quick Settings
Click the clock in the bottom right corner to open Quick Settings, then tap Screen capture. It opens exactly the same toolbar. This is the route to teach someone who will not remember a three-key combination, and the one that always works when the keyboard is detached, broken or in another language.
External keyboards without a Show windows key
Plug a normal Windows keyboard into a Chromebook and the Show windows key simply is not there. ChromeOS maps the top row instead: the F5 key stands in for Show windows.
- Ctrl + Shift + F5 opens the capture toolbar. This is the combination Google's own help lists for keyboards without the key.
- Ctrl + F5 takes a full screenshot on most setups, following the same logic.
If neither works, check the keyboard settings: when the option to treat top-row keys as function keys is switched on, the mapping changes, and you may need the Search (Launcher) key held as well. When in doubt, Quick Settings bypasses the keyboard entirely.
The Print Screen key on a Windows keyboard does not reliably take a ChromeOS screenshot, which surprises people who are used to it. If you live on both systems, our Windows screenshot guide has the other half.
Tablets and convertibles
Fold a convertible Chromebook back into tablet mode, or use a detachable without its keyboard, and the keys are gone. Two options remain:
- Power + Volume down at the same time takes a full screenshot, exactly like a phone.
- Hold the Power button until the menu appears, then tap Screen capture for the full toolbar with area, window and recording.
The phone-style combo is fast but only does full screen. If you need an area, open the toolbar and drag with your finger; the selection handles are large enough for touch.
With a stylus
On Chromebooks that ship with or support a stylus, a stylus tools menu appears on the shelf when the pen is in use, and it includes screen capture options alongside the note and magnifier tools. It is the most natural way to grab an area on a tablet: tap the pen menu, choose the capture, and draw the region you want. The exact entries vary with the ChromeOS version and the device, so if you do not see a capture item in that menu, the Power button route above does the same job.
Where Chromebook screenshots are saved
Every screenshot and recording goes to Downloads in the Files app by default, named with the date and time. Three more things happen at the same time:
- It is copied to the clipboard. You can paste it into Docs, Gmail or a chat with Ctrl + V without ever opening Files.
- It shows up in clipboard history. Search + V opens the last five things you copied, screenshots included, which rescues the one you took two captures ago.
- It shows up on the shelf. Recent screenshots and recordings appear in the shelf area next to the clock (Google has called this space Tote and holding space over the years), where you can drag them straight into an email or a form, or pin the ones you will need again.
Changing the folder
Open the toolbar with Ctrl + Shift + Show windows, click the Settings gear, and choose Select folder. A folder inside Google Drive is a popular pick: screenshots then sync to your other devices without you moving anything. The trade-off is that a Drive folder needs a connection to show new files elsewhere, while Downloads is instant and local.
Screen recording, with or without sound
The same toolbar records video. Switch to Screen record, pick full screen, partial or window, and the countdown starts. Open the settings gear first if you care about sound or format:
| Setting | Options | What it is for |
|---|---|---|
| Audio | Device audio, microphone, or both | Device audio captures what the Chromebook plays; the microphone captures your voice |
| Camera | Front camera on or off | Puts your face in a small bubble on the recording |
| Format (partial mode) | Video (.webm) or GIF | GIF is perfect for short silent loops; it does not record audio or the camera |
| Show clicks and keys | On or off | Displays the shortcuts you press and your clicks, ideal for tutorials |
To stop, click the red stop button on the shelf or press Search + Shift + X. The file lands in the same folder as your screenshots.
Being able to record the device's own audio is something ChromeOS does better than some desktop systems: the built-in recorder on a Mac, for example, has no way to capture system sound without extra software. Recordings come out as .webm, which plays in Chrome and uploads fine to YouTube and Drive, but some older editors and messaging apps refuse it; upload to Drive and share the link if that happens.
Can a Chromebook take a scrolling screenshot?
Not with the built-in tool, as far as Google's own documentation goes: the capture toolbar offers full screen, partial and window, and nothing that scrolls. Some articles claim otherwise; we could not find it in the official help as of October 2026. What actually works for a long web page:
- Chrome's hidden full-page capture. Press Ctrl + Shift + I to open developer tools, then Ctrl + Shift + P, type screenshot and choose Capture full size screenshot. The whole page, top to bottom, lands in Downloads as one PNG. On school or work Chromebooks, developer tools may be blocked by the administrator. Every variant of this trick is in full page screenshots in Chrome.
- Print to PDF. Ctrl + P, choose Save as PDF. The text stays selectable and the file is often smaller than a giant image.
- Several captures in a row. The last resort, fine for a chat thread you just need as evidence.
School and work Chromebooks that refuse to screenshot
If the shortcuts do absolutely nothing and the Screen capture tile is missing or greyed out, the Chromebook is probably managed. Schools and companies can switch off screenshots with a single admin policy, and nothing on the device can override it. It is not broken, and resetting it will not help; ask whoever manages it. Separately, some protected content (certain streaming video, for example) shows up black in captures on purpose, the same as on every other system.
Editing and sharing the screenshot
Click the notification that appears after the capture to open the image in the Gallery app, which handles the basics: crop, rotate, resize and light adjustments. That covers most homework and support-ticket needs.
Two common next steps, both doable in the browser:
- Make it presentable. A raw capture pasted into a slide looks unfinished. Our screenshot beautifier adds padding, a background, rounded corners and a shadow, and it runs in Chrome, so it works on a Chromebook with nothing installed. Paste the screenshot straight from the clipboard.
- Make it smaller. Chromebook screenshots are PNG, which is sharp but heavy. If a form or an email limits upload size, convert it with the PNG to JPG converter, which also runs locally in the browser.
Shortcut cheat sheet
| Action | Shortcut |
|---|---|
| Full screenshot | Ctrl + Show windows |
| Capture toolbar (area, window, record) | Ctrl + Shift + Show windows |
| Same, on an external keyboard | Ctrl + Shift + F5 |
| Tablet screenshot | Power + Volume down |
| Stop a recording | Search + Shift + X |
| Clipboard history | Search + V |
Also on a Mac? The equivalents there are completely different keys; our Mac screenshot guide maps them out.