The short answer
- Open QuickTime Player (Applications folder, or Spotlight).
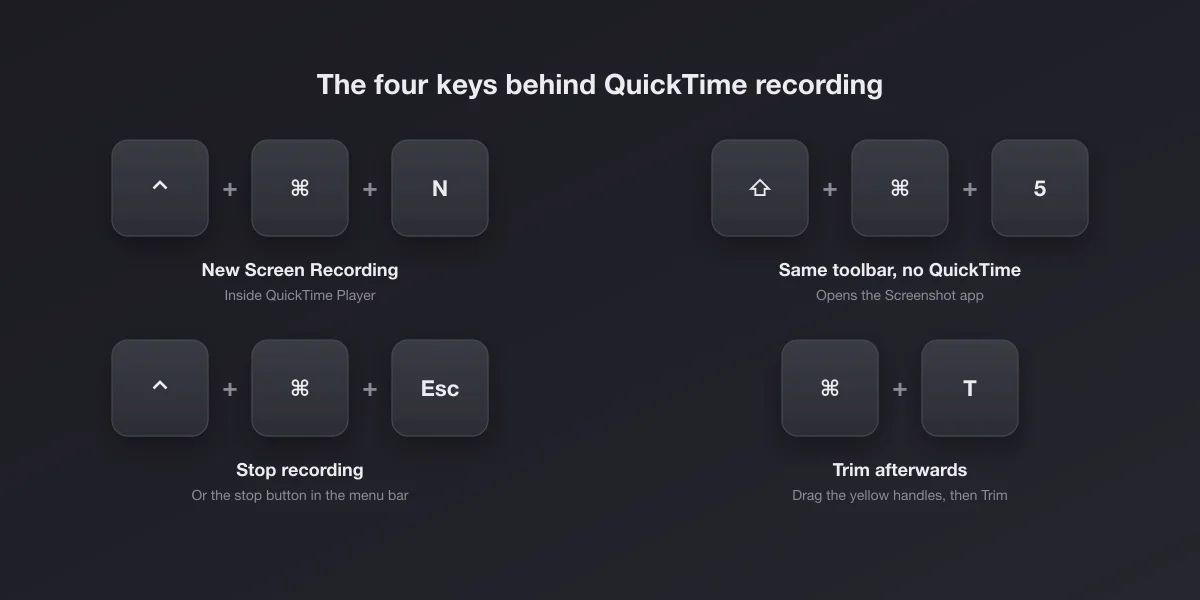
- Choose File, New Screen Recording, or press ⌃⌘N.
- In the toolbar that appears, pick the whole screen, a window or a portion, set Options (microphone, timer, save location), and click Record.
- Stop with the stop button in the menu bar or ⌃⌘Esc.
The file lands on your Desktop as Screen Recording [date] at [time].mov. Your voice is recorded if you choose a microphone; the sound your Mac plays is recorded only on macOS 27 or later. Details below.
QuickTime now opens the Screenshot app
This confuses people who follow old tutorials. Apple's own instructions say that when you choose New Screen Recording, one of two things happens:
- You see a floating toolbar at the bottom of the screen. Recording is being done by the Screenshot app, the same one you get with ⇧⌘5. This is what every recent macOS shows.
- You see a small Screen Recording window with a red button. That is the old QuickTime recorder, found only on older macOS versions.
Practical consequence: on a current Mac you do not need QuickTime to record at all. ⇧⌘5 opens the exact same recorder in one step. QuickTime is still useful after recording, to trim and export.
Step by step, with the toolbar
The toolbar's right half is for video. Three recording modes:
| Button | What it records | Available on |
|---|---|---|
| Record Entire Screen | Everything on one display; click the display to start | All recent macOS |
| Record Selected Window | One window only, then click the window | macOS Tahoe 26 or later |
| Record Selected Portion | A rectangle you drag and resize | All recent macOS |
Click Record (or the window, in window mode). A stop button appears in the menu bar. Press Esc before you start to cancel.
The Options menu, setting by setting
| Option | What it does | Worth changing? |
|---|---|---|
| Save to | Desktop (default), Documents, Mail, Messages, QuickTime Player, or Other Location | Yes: choose QuickTime Player if you always trim, or a dedicated folder |
| Timer | None, 5 or 10 seconds before recording starts | Yes, to hide the toolbar and get your hands in place |
| Microphone | None, or any connected input | Only if you narrate |
| Include System Audio | Records the sound the Mac plays | macOS 27 Golden Gate or later only |
| Show Floating Thumbnail | A preview in the corner after you stop | Turn off if you record many clips in a row |
| Remember Last Selection | Reuses the last portion you drew | Yes, for repeated takes |
| Show Mouse Clicks | A black circle around the pointer on every click | Yes, for tutorials |
| SDR or HDR | H.264 for compatibility, or HEVC in HDR | Keep SDR unless you know you need HDR (Tahoe 26+, supported Macs) |
Where QuickTime screen recordings are saved
By default, on the Desktop, named Screen Recording 2026-10-05 at 10.42.13.mov or similar. If a floating thumbnail appears in the corner, the file is saved only after the thumbnail disappears (or when you click it to edit). If you set Save to QuickTime Player, the recording opens unsaved in a QuickTime window instead, and you choose where to save it with ⌘S.
Can't find a recording? Check the Options menu for the current destination; the same setting controls screenshots, which our guide on where screenshots go on Mac explains in detail.
Trimming and basic editing in QuickTime
This is where QuickTime still earns its place. Open the recording in QuickTime Player, then:
- Trim: Edit, Trim, or ⌘T. Drag the yellow handles to the new start and end, click Trim.
- Split: move the playhead and choose Edit, Split Clip (⌘Y) to cut a long recording into parts you can delete or reorder.
- Rotate or flip: from the Edit menu, mostly useful for recordings of a phone.
- Export smaller: File, Export As, then 4K, 1080p, 720p or 480p depending on the source. A 720p export is often a fraction of the size and perfectly readable for a bug report.
Trimming from the floating thumbnail works too: click the thumbnail, then the trim icon. For anything more (cuts in the middle, captions, zooms) you need a real editor.
The big limit: system audio
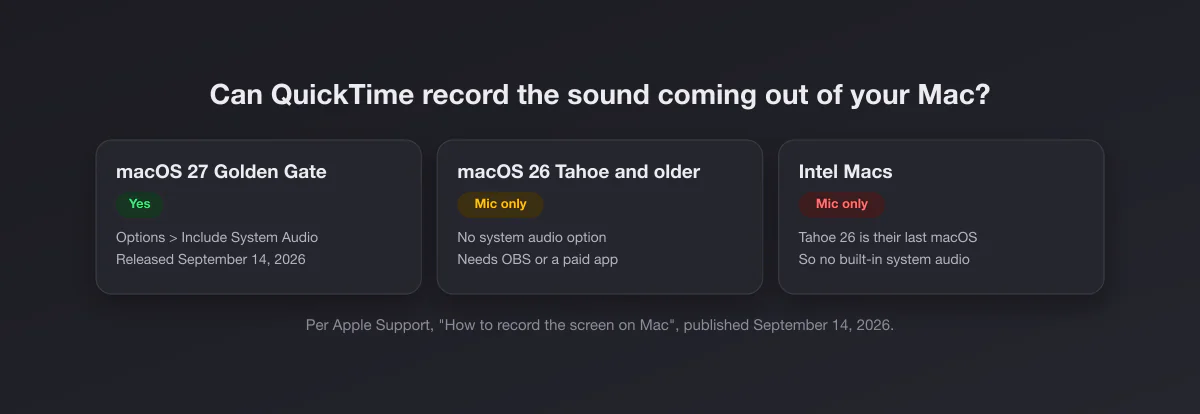
For years, QuickTime recorded your microphone but never the sound coming out of the Mac: the video you were demonstrating, the other side of a call, an app's alerts. The result was a silent recording or one with tinny speaker sound picked up by the mic.
Apple changed this with macOS 27 Golden Gate. Its support article, published September 14, 2026, reads: to record system audio with the screen recording in macOS 27 or later, choose Include System Audio. Because QuickTime uses the Screenshot toolbar, the option shows up there too.
On macOS 26 Tahoe and earlier nothing changed: microphone only. That includes every Intel Mac, since Tahoe is the last macOS they get. If that is you, you need extra software, covered in the next section.
Other things QuickTime cannot do
- No GIF export. Only video files.
- No webcam overlay. The usual workaround is File, New Movie Recording, then View, Float on Top, and record the screen with the camera window visible. It works but looks improvised.
- No pause. You stop and start a new file, then join clips with Edit, Add Clip to End.
- No backgrounds, zooms or cursor effects beyond the click circle.
- Protected apps record black. Apple notes some apps, such as the Apple TV app, might not let you record their windows.
Fixing the common problems
| Problem | Likely cause | Fix |
|---|---|---|
| The recording shows only the wallpaper | Screen Recording permission missing | System Settings, Privacy and Security, Screen and System Audio Recording, allow the app, then reopen it |
| No sound at all | Microphone set to None, or you expected system audio on macOS 26 or older | Pick a microphone in Options; for the Mac's own sound see the section above |
| Your voice echoes or sounds hollow | Speakers bleeding into the mic | Use headphones, or lower the volume |
| The file is huge | Full Retina resolution, long recording | Record a portion or window, then File, Export As, 720p or 1080p |
| Recording stops by itself | Disk almost full | Free space; screen recordings grow fast at Retina resolution |
| A notification appears mid-recording | Focus off | Turn on Do Not Disturb before you press Record |
Alternatives when QuickTime is not enough
| Tool | Price (Oct 2026) | Fixes | Trade-off |
|---|---|---|---|
| OBS Studio | Free, open source | System audio on macOS 13+, webcam, scenes | Heavy setup for short clips |
| CleanShot X | $35 once, optional $19/yr updates | System audio, GIF, video editor, webcam | More app than many need |
| Screen Studio | $29/mo, or $9/mo billed yearly | System audio, auto zoom, smooth cursor | Subscription |
| Capturo (ours) | $29 once | System audio, webcam bubble, composed over a gradient | No editor; GIF only from clips up to 45 s |
Disclosure: Capturo is our Mac app. ⇧⌘9 records the screen or an area with system audio on macOS 14 or later, composed live over a gradient background with rounded corners, with an optional webcam bubble, microphone (macOS 15+) and auto-zoom on clicks (beta). Recordings are MP4; GIFs come from a recording: Convert Video to GIF makes a 12 fps, 960 px wide GIF from clips up to 45 seconds. It is the fit when QuickTime's output is fine except that it is silent and looks raw. It is not the fit for long tutorials that need editing; there, Screen Studio or OBS plus an editor do more (see our Screen Studio alternatives and best screen recorder for Mac). Download Capturo. And on macOS 27, if all you were missing was the sound, QuickTime itself now covers it for free.
Recording an iPhone or iPad with QuickTime
A lesser-known trick that still works: connect the iPhone with a cable, open QuickTime, choose File, New Movie Recording, then click the arrow next to the record button and pick the iPhone as both camera and microphone. QuickTime shows the phone's screen live and records it, sound included. Handy for app demos when the phone's own recorder is not enough.
Recording on a MacBook
Everything above applies to MacBooks. Two laptop-specific notes: plug in the charger for long recordings, since encoding drains the battery, and close the lid only after you stop. For still captures on the same machines, see how to screenshot on a Mac.